 |
| Hanging out with Keith in his tying room (2011) |
When it comes to tying hairwing Atlantic salmon flies, one of my favorite reference books is Hair-Wing Atlantic Salmon Flies by Keith Fulsher and Charlie Krom (Fly Tyer Inc., 1981). Though the book has been out of print for several years, used copies can found relatively easily and for a reasonable price. Many books are just a collection of patterns. Hair-Wing Atlantic Salmon Flies has dressings for more wet flies than anyone needs, but also has great tying instruction (as well as some good stories).
I have been very influenced by the way Mr. Fulsher and Mr. Krom tie wet fly bodies in their book. The first thing that stood out to me was their use of wool in place of floss in the instruction fly. My good friend Bob Skowronski, an innovative fly tyer and superb angler, ties many of his salmon flies with wool instead of floss. Over the years, Bob has schooled me on the merits of a wool body. A few years back, I made the switch from floss to Uni-Stretch. Not long after, I began using wool in place of both in all but a few scenarios.
Wool holds up better to a salmon's teeth and to rough treatment with hemostats. Also, it absorbs water better, so the flies sink a little more easily. If I want a fly to fish on the surface (i.e., riffling hitch), I still use floss or Uni-Stretch since they absorb less water than wool yarn. Also, some patterns just need floss. I can't imagine tying a Rusty Rat with yarn.
The other aspect of the Fulsher and Krom body that I have adopted is the tapered, cigar-like shape. By creating a downwards taper towards the head of the fly, the wing lays low and can be tied in over a minimum amount of bulk. Giving thought to material tie-in points and cut-off points go a long way in creating an underbody that enhances the taper.
Shown below is an illustrated step-by-step of a Fulsher and Krom style wool body. It's not exactly how Fulsher and Krom demonstrate in their book. It's a derivative of their technique that has worked well for me. As always, if you have any questions, feel free to ask.
--------------------------------------------------------
Step 1: Start with white thread and tie in a tinsel tip. Tie the butt ends of the tinsel almost to the thread's starting point. Tie in a piece of fluorescent wool yarn for the butt. The tie-in point is about flush with the end of the hook eye's return.
Step 2: Wrap the butt and tie down the tag end of the wool. The tie-off point should be just behind the tie-in point.
Step 3: Switch to black thread to go underneath the black portion of the body. Tie in the oval silver tinsel rib just behind the tie-off point of the fluorescent yarn. Typically, I would tie in the tail before the rib, but this yarn is a little bulky and I want a higher thread base to keep the angle of the tail down.
Step 4: Tie in the hackle fiber tail just behind the tie-in point of the tinsel. Staggering the tie-in points of the materials helps to create our finished body taper.
Step 5: Tie in a piece of yarn for the body (black, in this case). The tie in point should be just behind the tie in point of the tail.
Step 6: Advance the thread to the point where the body will end. Wind the wool forwards, but not all the way to the thread.
Step 7: Reverse the direction of the wool. Wrap it backwards over the small section of forwards-wrapped wool. Stop at the fluorescent butt.
Step 8: Wind the yarn towards the eye. Note that the last couple of turns will be over the little bit of thread that isn't covered with wool. Tie off the wool.
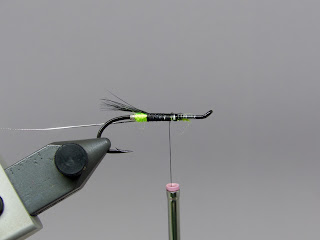
Step 9: Wrap the oval tinsel rib with five even turns and tie off. Notice the body's distinct downward taper. This will help prevent the wing from kicking up. Also make note of how much space is left between the completed body and the eye. There should be enough room that the eye is not crowded when finished.
Step 10: Tie a throat hackle over the few turns of thread used to tie down the tinsel. Tie the wing to an appropriate length, make a neat thread head, and finish the fly with two coats of lacquer.
 |
| Black Bear Green Butt (sz. 6) The wing is fox mask (dyed black) subbed for bear hair |


Great tutorial, Ben, and I like the company you keep!
ReplyDeleteThanks, Gary! Hope you're catching some salmon!
Deletegreat tutorial! thanks!
ReplyDeleteThanks for reading, Taro!
Delete