Monday, January 30, 2017

Blue Charm: Salmon Fishing in Scotland with Ian Gordon


Ian Gordon - your host on a tour of Scottish salmon rivers

     It took longer than normal for the annual holiday binge/purge cycle to go away this year. Last night, I finally had enough of it. I decided to dig out my running shoes and dust off the treadmill. I hate the treadmill. I don't really like running outside, either. I always preferred playing a sport to running. I miss living near the beach and going surfing. I've been considering getting my tennis skills back together this summer and possibly joining an indoor tennis club next winter. Anyhow...

     The treadmill is much more pleasant when I have angling videos to watch. I've been aware of Ian Gordon's movie Blue Charm for a while, but never saw more than the trailer. Last night was as good as any to watch it, so I found it streaming on fishingtv.com.

     Based on the trailer, I knew I would see beautiful footage of Scottish salmon rivers. The movie did not disappoint. I got a good look at the Rivers Dee, Spey, and Findhorn. At 84 minutes, Gordon's movie is a combination of history lessons, interviews, fishing strategy, and traditional spey casting instruction. Gordon even demonstrates fishing with an antique 15' greenheart rod, which was particularly interesting.

     In the past, Scotland was never at the top of my list of salmon fishing destinations, but I have been reconsidering it. The beauty of the landscape and the wealth of angling history is starting to push Scotland near the top of my list (Iceland is still #1). Watching Blue Charm reinforced this my changing opinion. With the USD to GBP exchange rate still favorable, the gears in my mind are turning.

     I'm glad I rented this movie and didn't purchase it. I'm not sure how often I would rewatch it. However, the DVD would be a wise purchase for a beginning Atlantic salmon angler. Gordon covers the rudiments of Atlantic salmon fishing in a way that is easy to understand, yet still entertaining. In my opinion, the best part was how he broke down pool coverage. Sometimes the longest cast isn't the best cast!

     In all, it was about as enjoyable as a treadmill workout can be. Every fly angler should watch this at least once. For those who are curious about or just beginning to fish for Atlantic salmon, I recommend buying the Blue Charm DVD and watching it a few times. After some time watching Ian Gordon present the basics, DVDs with alternative/advanced strategies (i.e. Henrik Mortensen's Fly Fishing Academy series) will makes more sense.


Monday, January 23, 2017

American Shad Flies - Part II: Flies, Darts, and Data


Handful of shad soft hackles (sz. 8-10)

     In Part I of this short series, I demonstrated how to tie my standard, bread and butter shad fly. It is a simple, effective, and easy to tie pattern. In addition to that fly, I have a few other patterns I like to use. However, before I describe the others, let's take a look at some shard darts, the standard lure used for American shad fishing.


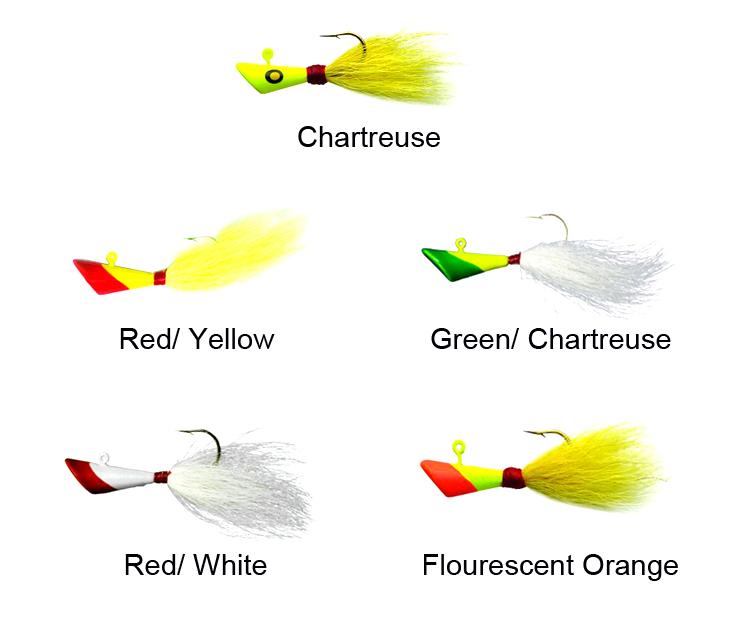
A seclection of Eagle Claw shad darts in common color schemes

     Shad darts and willow leaf spoons are the most widely used lures for American shad fishing. While willow leaves have no relation to flies, most darts involve a small degree of fly tying technique. Many traditional darts have a contrasting color scheme which can be easily replicated when tying shad flies. Darts, most often made with lead, can vary greatly in weight, from 1/64 oz up to 3/4 oz or more. The smallest darts can be used with a fly rod. The largest darts can put a hole in someone's head!
   

Mike Taylor shad dart

     In addition to being a great fisherman, my friend Mike Taylor ties some excellent tin (non-toxic) shad darts. The dart pictured above is tied in form of a traditional dart, but with some modern touches, such as Krystal Flash and glitter paint. Mike's darts are well constructed and very durable. Most importantly, they are excellent fish catchers. Notice how Mike's darts are tied on light wire, gold jig hooks.

Mike's "no frills" mini darts

     Mike gave me a couple of his mini darts last season when I needed to get down quickly. The red one (pictured above) caught a shad on its first cast. With no additional materials to slow down their descent, these mini darts are great sinkers. They also work well when shad nip at the back end of a traditional dart or long-tailed fly. This type of dart could easily be converted to a fly by using tungsten cone headsand tiny bit of material to hold it in place. A more esoteric option would be to use undressed bottle tubes, such as Shumakov Long Range or Skittle tubes.

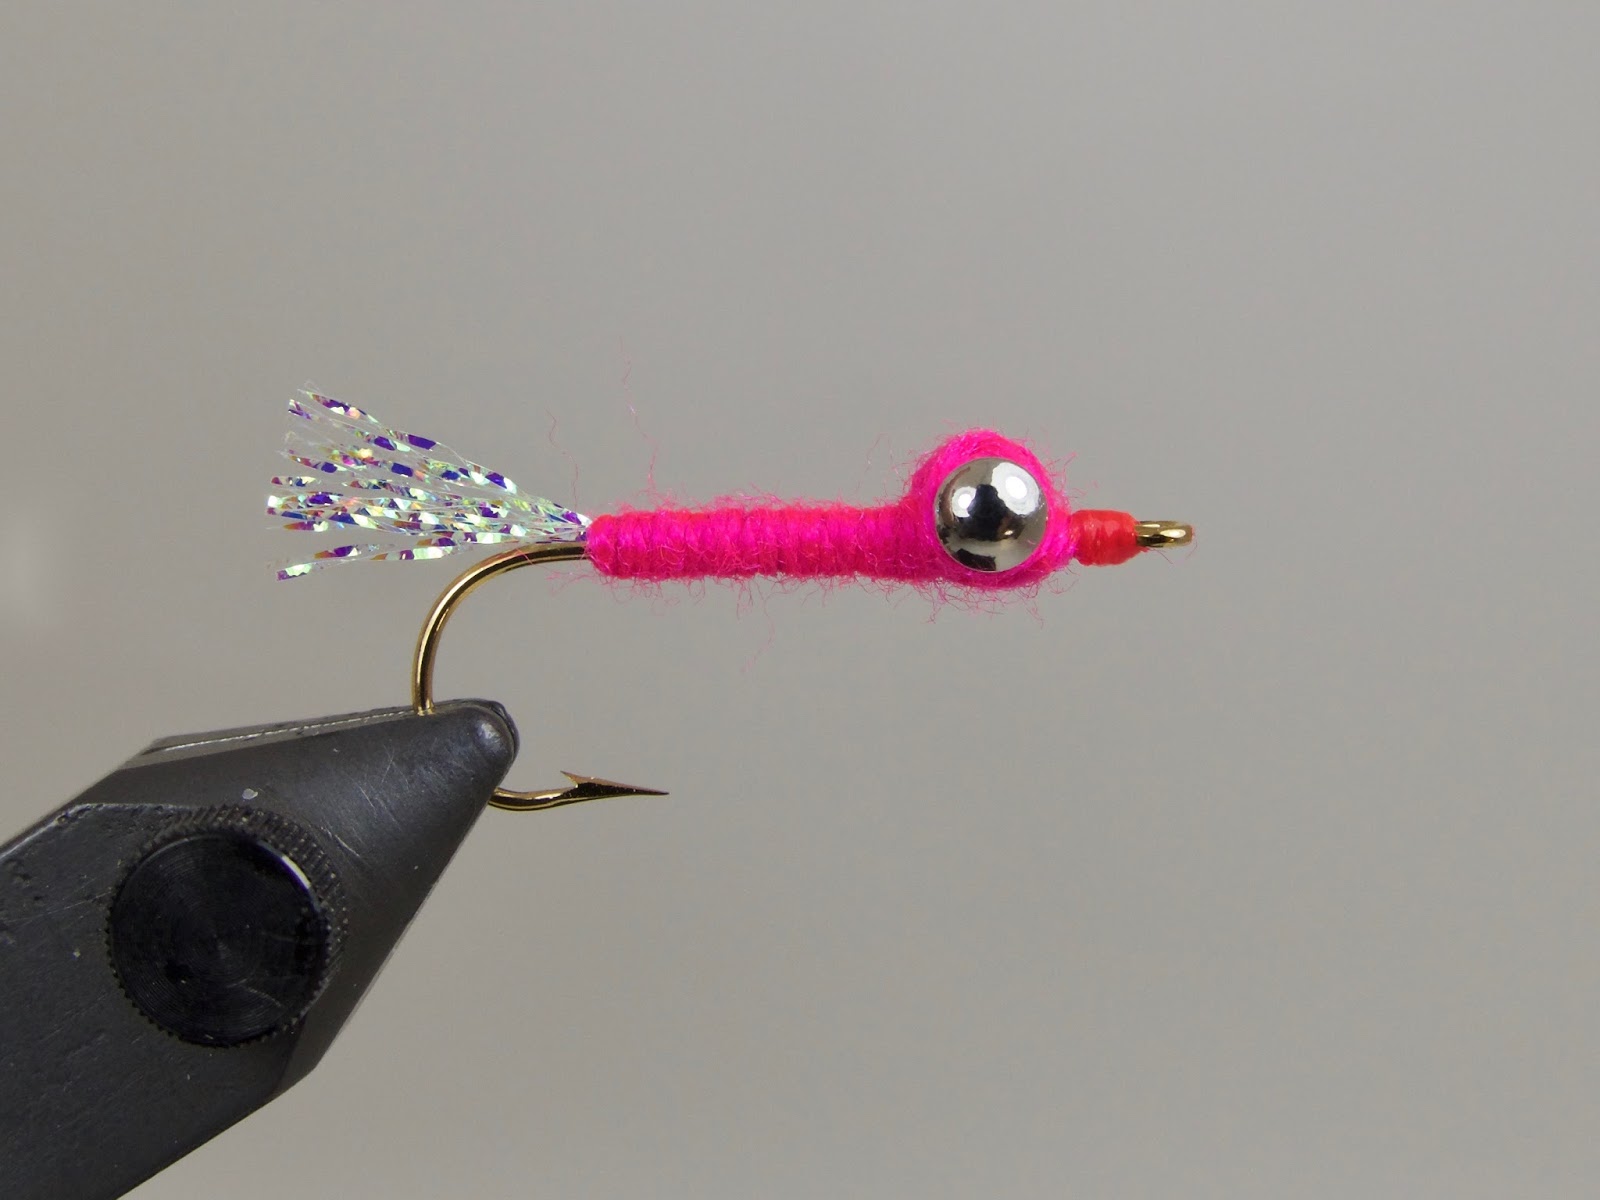
My standard, bread and butter shad fly

     The pink fly above is my basic pattern. This was the pattern shown in last week's step-by-step tutorial. My favorite colors are fluorescent orange, pink, green, blue, and red. They can be tied in bulk in next to no time at all.

The bread and butter fly, tied "low water" style

     Sometimes shad get "nippy," grabbing onto the rearmost part of a fly or dart. This happens often near the end of the run. It can also happen during severe weather/pressure changes. When shad refuse to commit, I switch to a pattern tied in the Atlantic salmon "low water" style. Basically, I tie a fly one size smaller than the hook I am using. In the picture above, I tied a size 6 fly on a a size 4 hook. I usually tie a short tail. In this case, the tail doesn't even extend past the bend of the hook. I haven't tried omitting the tail entirely but, if Mike's mini darts work, I don't see why a tailless fly would not.

     Another option is to trim the tail on flies and darts. If possible, cut the material back to a point shy of the hook bend. Even if the shad doesn't grab onto the whole fly, hopefully it will get the business end of the hook in its mouth. Sometimes shad absolutely cream a fly, sometimes you'll barely know a fish is on. Be aware of those little taps.

UV resin shad fly

     When I want a tiny bit of extra weight, I use a fly coated with Solarez UV cured resin. Honestly, until I weighed the flies, I thought the resin added more weight than it actually does (refer to the table below). It's sort of like going up one size of brass eyes without actually going up one size. I'm not sure it makes that much of a difference. This fly takes about twice as long to tie as my standard pattern. Despite the extra work, the blue version of this fly was an absolute killer for me last season, so now I'm afraid not to have some with me at all times. 

    This is essentially the same fly as the one posted in last week's tutorial other than the body. Instead of wool yarn, I make a tapered underbody with Uni-Stretch, then wrap over it with Veevus holographic tinsel. The tinsel is slippery, so wrap carefully and under sufficient tension. After whip finishing, apply a coat of UV cured resin to the entire fly. I coat it all the way up to the head.

Beadhead shad soft hackle

     When the water is low, the fish are heavily pressured, or both, I opt for a small bead head soft hackle wet fly. This fly has been very good to me. The toughest, most memorable shad I ever hooked was caught on the pink and yellow wet fly pictured above. Though I tie these on standard wet fly hooks, I would like to try the jig-style nymph hooks to keep the hook point riding up. Here is the dressing:

Bead Head Shad Soft Hackle

Hook: Mustad 3399A or equivalent (sz. 8-10)
Bead: Brass or tungsten (1/8"-5/32")
Weight: Non-toxic wire
Tail: Hackle fibers or Krystal Flash
Body: Fluorescent wool yarn
Thorax: Ice Dub (to match tail)
Hackle: Hen neck (to match tail)
Head: Ice Dub (to match tail)

Favorite color combinations (body/hackle): pink/yellow, orange/green, orange/yellow, green/darker green

Tandem rig, the top fly a variation on the basic pattern (chenille head)

     I have been using sinking Scandi heads to get my flies down and to help keep them in the zone longer. It has worked really well so far. However, there are times when I prefer to fish with a single handed rod, floating line, and mono leader. When I feel like I need more weight to get down with that rig, I use a long leader and two heavy flies. This has gotten me into the zone and into fish when one fly just wasn't cutting it. Tandem rigs are also good to see if the shad are keying in on one particular color or size of fly. I've had great success with the combo pictured above. I the larger fly seems to get the smaller fly into the strike zone. Some shad take the big fly, but most seem to grab the soft hackle. 


Size/weight chart for the flies featured in this post (click to enlarge)

     Sometimes I get curious about how much flies weigh, so I use my handy little scale. I weighed all the flies and darts featured in this post (with the exception of the Eagle Claw darts). I prefer to weigh in grams since it's easier to compare light weight flies than when using ounces. As stated above, I was surprised how little weight the UV cured resin added to the fly, though purely by coincidence, it moved proportionally with the increase in brass eye sizes. It also weighed slightly more than my heaviest dart, which also surprised me. Some flies were too light to register on my scale,  but I don't concern myself with weight when I'm fishing flies that small.

     Besides the non-toxic wire used on the soft hackles, the only metal I used was brass. Tungsten would make for much heavier flies. Heavier flies might require using heavier tackle, which might make a 2-6 lb fish less fun to catch. Overall, I am happy with the size and weights of these flies, particularly when sinking lines, heads, and tips get the flies down well enough. 

------------------------------------------------------

     I hope this post helps some of you. Shad are an often overlooked local gamefish. If you tied a fresh American shad and a comparably sized trout tail to tail, the shad would drown the trout in a heartbeat. Fighting a big, tough roe shad can be very exciting, especially on appropriately sized fly tackle. Give it a shot this spring! 
     

Looking forward to spring...

Monday, January 16, 2017

American Shad Flies - Part I: Simple Shad Fly Step-By-Step


American shad are loads of fun on light tackle. 

   
     What I enjoy most about the spring fishing season is its diversity. Spring is a time when unrelated species of anadramous game fish cross paths with each other as they travel upriver. At sea, however, they are scattered all over the Atlantic. American shad migrate to the Bay of Fundy in eastern Canada. Atlantic salmon migrate to the feeding grounds around Greenland and the Faroe Islands. Striped bass head north from Chesapeake Bay. I have no idea where our alien sea-run brown trout go, but I imagine they stay fairly close to home. The one thing they all have in common is the last leg of their respective journeys. Spring is a time when an angler might not know what is on the end of his or her line but, if it is fresh from the sea, chances are it will be an exciting battle. 

     The past couple of seasons, American shad fishing has caused me to put my normal routine on hold. The Connecticut River run has been around 300,000-400,000+ shad the past couple years, which is significantly more fish than the rest of the spring gamefish run combined. After a long winter, it can be nice to catch a lot of fish. A lot of hard fighting fish, as the case may be. Enough fish to decimate a fly box if an angler isn't careful. Shad don't have teeth, but catching twenty, thirty, forty, or more, in a day will destroy flies. If the fish don't wreck them, the bottom will, since most shad like a fly presented low in the water column.

     As such, it doesn't pay to spend much time tying shad flies. The fish aren't too picky. They're not eating. Even if they were, they feed on plankton, which is much smaller than our flies. They seem to lock into certain colors at times, so I like to tie a few different flies in several different colors. When the water is low, I like to fish a small beadhead softhackle (tied in psychedelic color schemes). When I need to get down quicker, I use a fly with a UV resin body to sink quickly. My bread and butter fly, the simplest of them all, is the subject of this post. 

     There are many step-by-step fly tying tutorials out there. What I want to focus on here is the reasons why I have made the decision to use certain materials or techniques. Some of the reasons may be obvious, some may not. Since this generic fly template is an easy tie for all skill levels, I hope the reader will key in on why decisions were made in addition to how the fly is constructed.


The killer fly, tied in Chinese Red
This is why it pays to use easy, inexpensive flies.  


Simple Shad Fly

Hook: Crappie/panfish hook- light wire, gold, Aberdeen bend (i.e. Mustad 3260B or Eagle Claw equivalent);    sizes 4-8
Thread: Danville Flymaster 3/0 (210 denier)
Eyes: Dumbbell or bead chain eyes 
Body: Danville flourescent nylon wool (blue, green, pink, & orange) or Uni-Yarn (Chinese red)


Fig. I: Gold panfish/crappie hooks

Fig. I:  When it comes to hook choice, I take my cue from those who tie shad darts. Darts are often tied on light wire, gold, crappie/panfish hooks with an Aberdeen bend. Shad often lie close to the bottom and/or in rocky areas. When a very light wire hooks hangs up, a tug or two will usually bend the hook and free it from the snag. With a pair of pliers or hemostats, the hook can be bent back very easily. Another reason to use these hooks is the "flex factor." Shad have very thin, fragile mouths. When they pull on a tight line, the hook flexes a bit with the tension. 


Fig. II: Making a thread bump

Fig. II:  I like a heavy thread with which to lock down the thick brass dumbbell eyes. Making a little ant-shaped thread bump helps keep the eyes seated correctly when tying them in.


Fig. III: Adding brass dumbbell eyes

Fig. III:   Similar to the Clouser Deep Minnow, dumbbell or bead chain eyes are added to the top of the hook shank to force the point to ride upwards, thus helping to avoid snags. These heavy eyes also help to sinker a fly quicker. On a size 4 hook, I use either 3/16" or 5/32" eyes. On a size 6 hook, I use 1/8" eyes. On a size 8 hook, I use either 3/32" brass eyes or small bead chain eyes.

     When tying in the eyes, use a figure eight motion to lock them in. After they are seated, I like to use a lot of thread tension to keep them in place (hence the 3/0 thread). I pull as hard as I can without breaking the thread. After the eyes are tied in, I add a drop of super glue to the thread. After catching a ton of fish, the eyes will eventually move around. The goal is to keep them firmly in place for as long as possible. 

     If you are tying a lot of shad flies at one time, it makes sense to tie up to this step, then place the hook aside and wait for the glue to dry. I usually pre-tie a bunch of eyes and keep them in a compartment-style fly box. When I need a certain color fly in a certain size, I take the eyed hook out and the rest of the fly can be finished in a minute or so. 


Fig. IV: Laying down a thread base


Fig. IV:  Lay down a base of thread for your tail material. If I am tying on pre-assembled eyed hooks, I usually switch to a smaller size thread to finish off the fly.


Fig. V: Adding a short tail of flash


Fig. V:  Color contrast is a staple in many shad darts. Often times, a bright color is offset with a white tail. For the tail of this fly, I like to use pearlescent Crystal Mirror/Electra flash. The pearl color contrasts well with the body of fluorescent wool. Crystal Mirror flash is like Krystal Flash on steroids. It's thicker, shinier, and really throws off a lot of light. 

     Since it is common for American shad to nip at the rear end of a fly, I like to keep my tails short. I don't tie them any longer than in the fly pictured above, and often times I tie the whole fly shorter. To tie it "low water style," start the body just above the hook point and cut the tail flush with the bend of the hook. As much as possible, I try to avoid the shad grabbing the rearmost part of the fly without grabbing any of the hook. A fly tied a bit undersized for the hook helps prevent the nipping.


Fig. VI: Tying in wool for the body

Fig. VI:  I like to use wool yarn for the body of this fly. It absorbs water and tends to get buggier looking as the fly gets chewed on. My favorite yarn is Danville's fluorescent nylon wool. The colors are spectacular for shad flies. I like their fire orange, green, blue, and fluorescent red (pictured here, which is really more like fuchsia than actual red). Since Danville doesn't make a real red color, I use Chinese red Uni-Yarn instead. It is a truly deadly color.


Fig. VII: The completed shad fly


Fig. VII:  Wrap the yarn up the hook shank and figure eight the yarn around the eyes several times. Tie it off, whip finish, and add head cement. Sometimes I tie two whip finishes and skip the cement. If desired, a contrasting fluorescent color can be used for the head. Just make sure the thread color lighter than the color of the body material so it doesn't show through when the fly gets wet.

---------------------------------------------

     Well, that's about as easy to tie as it gets. They are cheap, easy, durable, and very effective. If you live near a shad run, give it a try. In an upcoming post, I will explain the other two pattern templates I use. For lots of good information about fly fishing for American shad, click here to check out my buddy Sonny's blog! 


Releasing a fresh one back into the Connecticut River
(photo by M. Taylor)


Monday, January 9, 2017

Ghost Stonefly (var.): Video Step-By-Step


A lucky Ghost Stonefly


     Happy belated New Year! I want to start 2017 off with a video that might be helpful to some. I've received a few questions about tying various Atlantic salmon stonefly patterns. There's no mystery to it, as you will see in the video above. I have my own way of doing things that differ slightly from Todd Cochrane's original dressing for the Ghost Stonefly. My way isn't any better or any worse, just the way I like to do it. As always, feel free to ask any questions you might have.