Showing posts with label step-by-steps. Show all posts

Monday, January 16, 2017

American Shad Flies - Part I: Simple Shad Fly Step-By-Step


American shad are loads of fun on light tackle. 

   
     What I enjoy most about the spring fishing season is its diversity. Spring is a time when unrelated species of anadramous game fish cross paths with each other as they travel upriver. At sea, however, they are scattered all over the Atlantic. American shad migrate to the Bay of Fundy in eastern Canada. Atlantic salmon migrate to the feeding grounds around Greenland and the Faroe Islands. Striped bass head north from Chesapeake Bay. I have no idea where our alien sea-run brown trout go, but I imagine they stay fairly close to home. The one thing they all have in common is the last leg of their respective journeys. Spring is a time when an angler might not know what is on the end of his or her line but, if it is fresh from the sea, chances are it will be an exciting battle. 

     The past couple of seasons, American shad fishing has caused me to put my normal routine on hold. The Connecticut River run has been around 300,000-400,000+ shad the past couple years, which is significantly more fish than the rest of the spring gamefish run combined. After a long winter, it can be nice to catch a lot of fish. A lot of hard fighting fish, as the case may be. Enough fish to decimate a fly box if an angler isn't careful. Shad don't have teeth, but catching twenty, thirty, forty, or more, in a day will destroy flies. If the fish don't wreck them, the bottom will, since most shad like a fly presented low in the water column.

     As such, it doesn't pay to spend much time tying shad flies. The fish aren't too picky. They're not eating. Even if they were, they feed on plankton, which is much smaller than our flies. They seem to lock into certain colors at times, so I like to tie a few different flies in several different colors. When the water is low, I like to fish a small beadhead softhackle (tied in psychedelic color schemes). When I need to get down quicker, I use a fly with a UV resin body to sink quickly. My bread and butter fly, the simplest of them all, is the subject of this post. 

     There are many step-by-step fly tying tutorials out there. What I want to focus on here is the reasons why I have made the decision to use certain materials or techniques. Some of the reasons may be obvious, some may not. Since this generic fly template is an easy tie for all skill levels, I hope the reader will key in on why decisions were made in addition to how the fly is constructed.


The killer fly, tied in Chinese Red
This is why it pays to use easy, inexpensive flies.  


Simple Shad Fly

Hook: Crappie/panfish hook- light wire, gold, Aberdeen bend (i.e. Mustad 3260B or Eagle Claw equivalent);    sizes 4-8
Thread: Danville Flymaster 3/0 (210 denier)
Eyes: Dumbbell or bead chain eyes 
Body: Danville flourescent nylon wool (blue, green, pink, & orange) or Uni-Yarn (Chinese red)
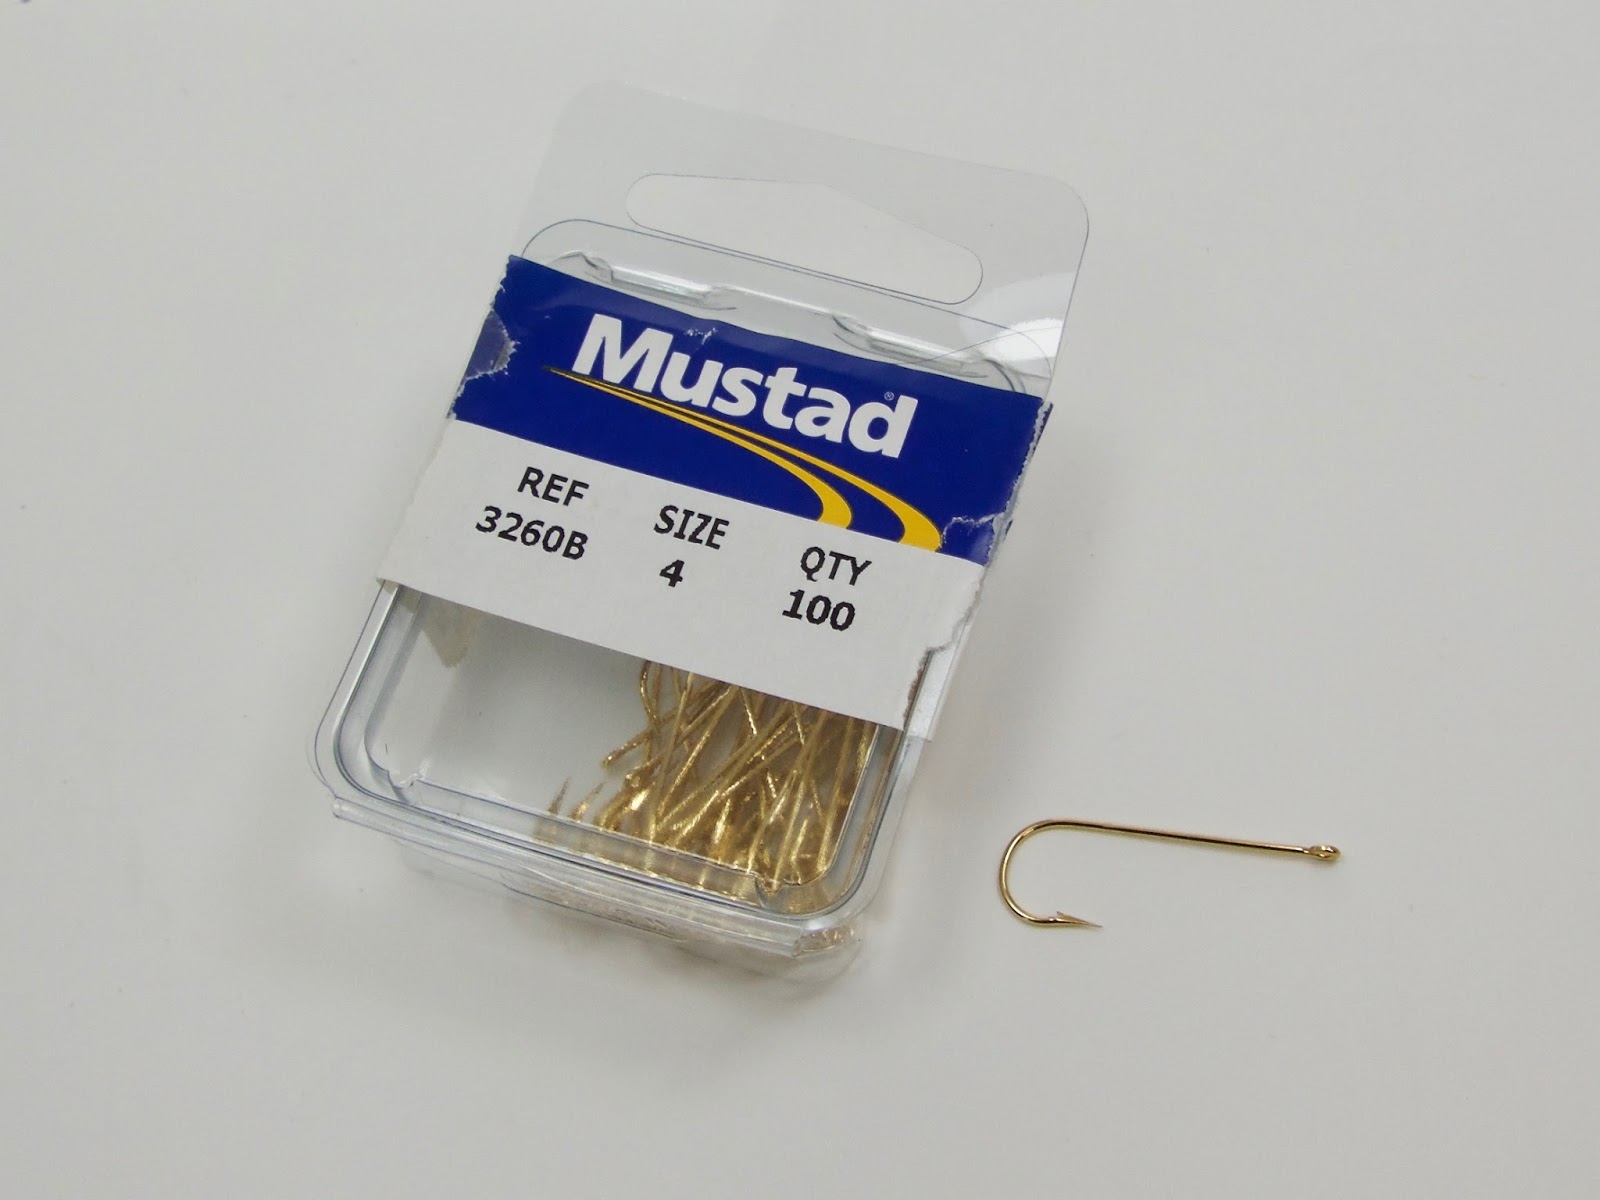


Fig. I: Gold panfish/crappie hooks

Fig. I:  When it comes to hook choice, I take my cue from those who tie shad darts. Darts are often tied on light wire, gold, crappie/panfish hooks with an Aberdeen bend. Shad often lie close to the bottom and/or in rocky areas. When a very light wire hooks hangs up, a tug or two will usually bend the hook and free it from the snag. With a pair of pliers or hemostats, the hook can be bent back very easily. Another reason to use these hooks is the "flex factor." Shad have very thin, fragile mouths. When they pull on a tight line, the hook flexes a bit with the tension. 


Fig. II: Making a thread bump

Fig. II:  I like a heavy thread with which to lock down the thick brass dumbbell eyes. Making a little ant-shaped thread bump helps keep the eyes seated correctly when tying them in.


Fig. III: Adding brass dumbbell eyes

Fig. III:   Similar to the Clouser Deep Minnow, dumbbell or bead chain eyes are added to the top of the hook shank to force the point to ride upwards, thus helping to avoid snags. These heavy eyes also help to sinker a fly quicker. On a size 4 hook, I use either 3/16" or 5/32" eyes. On a size 6 hook, I use 1/8" eyes. On a size 8 hook, I use either 3/32" brass eyes or small bead chain eyes.

     When tying in the eyes, use a figure eight motion to lock them in. After they are seated, I like to use a lot of thread tension to keep them in place (hence the 3/0 thread). I pull as hard as I can without breaking the thread. After the eyes are tied in, I add a drop of super glue to the thread. After catching a ton of fish, the eyes will eventually move around. The goal is to keep them firmly in place for as long as possible. 

     If you are tying a lot of shad flies at one time, it makes sense to tie up to this step, then place the hook aside and wait for the glue to dry. I usually pre-tie a bunch of eyes and keep them in a compartment-style fly box. When I need a certain color fly in a certain size, I take the eyed hook out and the rest of the fly can be finished in a minute or so. 


Fig. IV: Laying down a thread base


Fig. IV:  Lay down a base of thread for your tail material. If I am tying on pre-assembled eyed hooks, I usually switch to a smaller size thread to finish off the fly.


Fig. V: Adding a short tail of flash


Fig. V:  Color contrast is a staple in many shad darts. Often times, a bright color is offset with a white tail. For the tail of this fly, I like to use pearlescent Crystal Mirror/Electra flash. The pearl color contrasts well with the body of fluorescent wool. Crystal Mirror flash is like Krystal Flash on steroids. It's thicker, shinier, and really throws off a lot of light. 

     Since it is common for American shad to nip at the rear end of a fly, I like to keep my tails short. I don't tie them any longer than in the fly pictured above, and often times I tie the whole fly shorter. To tie it "low water style," start the body just above the hook point and cut the tail flush with the bend of the hook. As much as possible, I try to avoid the shad grabbing the rearmost part of the fly without grabbing any of the hook. A fly tied a bit undersized for the hook helps prevent the nipping.


Fig. VI: Tying in wool for the body

Fig. VI:  I like to use wool yarn for the body of this fly. It absorbs water and tends to get buggier looking as the fly gets chewed on. My favorite yarn is Danville's fluorescent nylon wool. The colors are spectacular for shad flies. I like their fire orange, green, blue, and fluorescent red (pictured here, which is really more like fuchsia than actual red). Since Danville doesn't make a real red color, I use Chinese red Uni-Yarn instead. It is a truly deadly color.


Fig. VII: The completed shad fly


Fig. VII:  Wrap the yarn up the hook shank and figure eight the yarn around the eyes several times. Tie it off, whip finish, and add head cement. Sometimes I tie two whip finishes and skip the cement. If desired, a contrasting fluorescent color can be used for the head. Just make sure the thread color lighter than the color of the body material so it doesn't show through when the fly gets wet.

---------------------------------------------

     Well, that's about as easy to tie as it gets. They are cheap, easy, durable, and very effective. If you live near a shad run, give it a try. In an upcoming post, I will explain the other two pattern templates I use. For lots of good information about fly fishing for American shad, click here to check out my buddy Sonny's blog! 


Releasing a fresh one back into the Connecticut River
(photo by M. Taylor)


Monday, January 9, 2017

Ghost Stonefly (var.): Video Step-By-Step


A lucky Ghost Stonefly


     Happy belated New Year! I want to start 2017 off with a video that might be helpful to some. I've received a few questions about tying various Atlantic salmon stonefly patterns. There's no mystery to it, as you will see in the video above. I have my own way of doing things that differ slightly from Todd Cochrane's original dressing for the Ghost Stonefly. My way isn't any better or any worse, just the way I like to do it. As always, feel free to ask any questions you might have.


Monday, September 28, 2015

Cascade: Video Step-By-Step


Here's another video tutorial, this time a shrimp/longtail pattern made famous by Scotland's Ally Gowans. Forgive the distractions...my dog barking and telemarketing calls...


Monday, June 29, 2015

Step-By-Step Tutorial: Salmon Fly Bodies (Variation on Fulsher & Krom)

Hanging out with Keith in his tying room (2011)

When it comes to tying hairwing Atlantic salmon flies, one of my favorite reference books is Hair-Wing Atlantic Salmon Flies by Keith Fulsher and Charlie Krom (Fly Tyer Inc., 1981). Though the book has been out of print for several years, used copies can found relatively easily and for a reasonable price. Many books are just a collection of patterns. Hair-Wing Atlantic Salmon Flies has dressings for more wet flies than anyone needs, but also has great tying instruction (as well as some good stories).

I have been very influenced by the way Mr. Fulsher and Mr. Krom tie wet fly bodies in their book. The first thing that stood out to me was their use of wool in place of floss in the instruction fly. My good friend Bob Skowronski, an innovative fly tyer and superb angler, ties many of his salmon flies with wool instead of floss. Over the years, Bob has schooled me on the merits of a wool body. A few years back, I made the switch from floss to Uni-Stretch. Not long after, I began using wool in place of both in all but a few scenarios. 

Wool holds up better to a salmon's teeth and to rough treatment with hemostats. Also, it absorbs water better, so the flies sink a little more easily. If I want a fly to fish on the surface (i.e., riffling hitch), I still use floss or Uni-Stretch since they absorb less water than wool yarn. Also, some patterns just need floss. I can't imagine tying a Rusty Rat with yarn. 

The other aspect of the Fulsher and Krom body that I have adopted is the tapered, cigar-like shape. By creating a downwards taper towards the head of the fly, the wing lays low and can be tied in over a minimum amount of bulk. Giving thought to material tie-in points and cut-off points go a long way in creating an underbody that enhances the taper. 

Shown below is an illustrated step-by-step of a Fulsher and Krom style wool body. It's not exactly how Fulsher and Krom demonstrate in their book. It's a derivative of their technique that has worked well for me. As always, if you have any questions, feel free to ask. 

--------------------------------------------------------


Step 1: Start with white thread and tie in a tinsel tip. Tie the butt ends of the tinsel almost to the thread's starting point. Tie in a piece of fluorescent wool yarn for the butt. The tie-in point is about flush with the end of the hook eye's return. 


Step 2: Wrap the butt and tie down the tag end of the wool. The tie-off point should be just behind the tie-in point.


Step 3: Switch to black thread to go underneath the black portion of the body. Tie in the oval silver tinsel rib just behind the tie-off point of the fluorescent yarn. Typically, I would tie in the tail before the rib, but this yarn is a little bulky and I want a higher thread base to keep the angle of the tail down.


Step 4: Tie in the hackle fiber tail just behind the tie-in point of the tinsel. Staggering the tie-in points of the materials helps to create our finished body taper. 


Step 5: Tie in a piece of yarn for the body (black, in this case). The tie in point should be just behind the tie in point of the tail. 


Step 6: Advance the thread to the point where the body will end. Wind the wool forwards, but not all the way to the thread. 


Step 7: Reverse the direction of the wool. Wrap it backwards over the small section of forwards-wrapped wool. Stop at the fluorescent butt. 


Step 8: Wind the yarn towards the eye. Note that the last couple of turns will be over the little bit of thread that isn't covered with wool. Tie off the wool. 


Step 9: Wrap the oval tinsel rib with five even turns and tie off. Notice the body's distinct downward taper. This will help prevent the wing from kicking up. Also make note of how much space is left between the completed body and the eye. There should be enough room that the eye is not crowded when finished. 

Step 10: Tie a throat hackle over the few turns of thread used to tie down the tinsel. Tie the wing to an appropriate length, make a neat thread head, and finish the fly with two coats of lacquer. 


Black Bear Green Butt (sz. 6)
The wing is fox mask (dyed black) subbed for bear hair


Tuesday, April 28, 2015

Yellow Wing Butterfly: Video Step-By-Step


I had a few requests for more fly tying videos, so here is #2. I didn't plan on making this video beforehand, but I wanted to tie a few butterflies, so I let the camera roll for the heck of it. I'm still ironing out the kinks when it comes to making and editing these videos. I hope to have a good system in place soon and will be able to post video step-by-steps with more frequency. Thanks for watching!

Monday, September 15, 2014

Same Thing Murray: Video Step-By-Step


This is my first attempt at an instructional fly tying video, so please forgive any sloppiness in the video quality, editing and tying! I will post more videos in the future, ironing out some of the kinks in the process. Any advice on shooting fly tying video is greatly appreciated!

Monday, September 1, 2014

Micro Snaelda Conehead: Step-By-Step

The materials


Micro Snaelda

Tube: Small plastic tubing w/junction tubing tied directly on the tube 
Flash: 4 strands of pearl Krystal Flash 
Tail: Yellow, orange and black bucktail
Body: Large brass or tungsten cone, matte black
Hackle: Black hen saddle


Step 1: Using a sharp razor, cut a piece of small plastic tubing and attach a piece of junction tubing. In this case, I used HMH rigid plastic tubing and the thick junction tubing included in the package. 


Step 2: Affix the tying thread to the small section of junction tube that overlaps with the small plastic tubing. Other than the hackle, all tying is done on top of this junction tubing. 


Step 3: Tie in four pieces of pearl Krystal flash and cut to roughly 1" in length


Step 4: Cut, clean and stack a small bunch of yellow bucktail. Tie it in on top of the junction tube. Use your thumb and finger to distribute it about a third of the way around the tube. 


Step 5: Repeat with orange and black bucktail.


Step 6: Cut the butt ends of the bucktail so they end at the forward most edge of the junction tube. 


Step 7: Whip finish and add a light coat of Krazy Glue or head cement. 


Step 8: Slide a cone all the way back, over the butt ends of the bucktail. 


Step 9: Reattach the thread just ahead of the cone. If the cone is loose fitting, you might have to build a small layer of thread to help keep it in place. 


Step 10: Prepare a hen saddle feather by stoking the barbs downward and trimming the tip of the feather. 


Step 11: Tie the hackle in by the tip. Fold the barbs rearward while wrapping the hackle around the tube. 


Step 12: Tie off the hackle feather and trim what's left. Form a small head and whip finish.


Step 13: Remove the fly from the needle and trim the excess plastic tubing with a sharp razor. Carefully burn the end of the tube to flare the plastic. 


Step 14: Coat the head in lacquer and you're done! 


Add a small hook and it's ready to fish

Friday, August 2, 2013

Step-by-Step: How to Fold a Hackle With Your Scissors

Flamethrower tubes - Folding stiff hackles is easy with this technique

I was first made aware of the scissor folding technique by my favorite Miramichi River guide, Darryl Tucker. It took Darryl but a few seconds to fold a hackle with his scissors, while it took me much longer to fold one by hand.  Darryl pre-folds his hackles by placing the tip of the feather in the jaw of his Regal vise. I have seen tyers fold hackles with scissors while the hackle is tied into the fly, but I liked Darryl's method more. The only thing I disliked was using the vise jaws to hold the hackle. The easy solution to the problem was to use a variation of the "third hand." I dangle hackle pliers from the rotary end (cam end on an HMH) of my Renzetti Traveller vise, which frees up both of my hands (see below).

I rarely remove this helpful tool

I have a set of these brass Dr. Slick hackle pliers on both my HMH Standard and my Renzetti Traveller. I just purchased a Renzetti Master vise and, unfortunately, the vise shaft is too thick to accommodate this style of hackle pliers. Luckily, I stumbled across a tool called "Swiss pliers w/spring ring." I placed the Renzetti Master's stem through the ring end of the tool. It works great and stays out of my way (see below).

Renzetti Master Vise with Swiss Pliers

Anyhow, let's get to the step-by-step instructions on how to fold a hackle with your scissors...


Step 1: Select a hackle. This orange hackle comes from a Chinese rooster cape


Step 2: Pull downward on the barbs so they are more or less perpendicular to the stem


Step 3: Place the tip of the hackle in the dangling hackle pliers


Step 5: Use another set of hackle pliers to hold the feather steady.You can use your fingers, but I find the feather rolls less when using pliers. 


Step 6: Place the tip of your scissors against the hackle stem, just below the upper set of pliers. The tips of the scissors should be at a right angle to the barbs. 


Step 7: Drag the tips of your scissors downwards along the stem. You should feel the barbs "clicking" as the scissors fold them inwards.


Step 8: When you finish one side, repeat Step 7 on the other


Step 9: Determine if the fold will suit your needs


Step 10: If you desire, the hackle can be folded over even more with moistened fingers


The folded hackle, ready for tying in only seconds after being plucked from the neck (below)


I usually fold with the scissors then, if necessary, make manual adjustments while wrapping the hackle. I tend to stroke the fibers into place as I wrap the hackle. This is a fast and effective way to fold both body and collar hackles. If the hackle is for a fishing fly, I can fold it well enough to use in about 10-20 seconds, plucked off the neck or saddle. If it's for a show fly, I usually am a bit more careful when I fold. This technique even works with very stiff dry fly hackles, which might be otherwise difficult to fold using only your hands. 

Give it a try sometime. Make sure you feel the feather "click." You'll know what I mean when you feel it happening. If it's clicking, you're doing something right!